
Effective leave management is crucial for balancing employee well-being with operational productivity, ensuring that absences do not lead to project bottlenecks or burnout. Many teams already live and breathe Jira for planning, tracking, and collaboration, yet still handle vacations and sick days through emails, spreadsheets, or side conversations.
The result? Missed approvals, overlapping absences, and project plans that quietly fall apart.
With TeamBoard TimePlanner, you can turn Jira into a transparent, structured day-off management system without reinventing your workflow or overwhelming your team.
Let’s walk through a real-world use case of how teams set up a smooth employee day-off workflow inside Jira.
What is a day off?
A day off refers to any approved period when an employee is not available during their regular working hours. This includes planned absences such as vacation or parental leave, as well as unplanned time off like sick leave or personal emergencies. A day off can cover a full day or a partial day, depending on company policy.
From a planning perspective, a day off is more than just an absence—it directly affects team capacity, task ownership, and delivery timelines. If time off is not tracked accurately, teams may plan work based on availability that doesn’t actually exist, leading to delays and uneven workloads.
What is the day-off workflow?
The day-off workflow describes the process employee leave follows from request to completion. It ensures that time off is approved, recorded, and reflected in team planning so availability remains accurate.
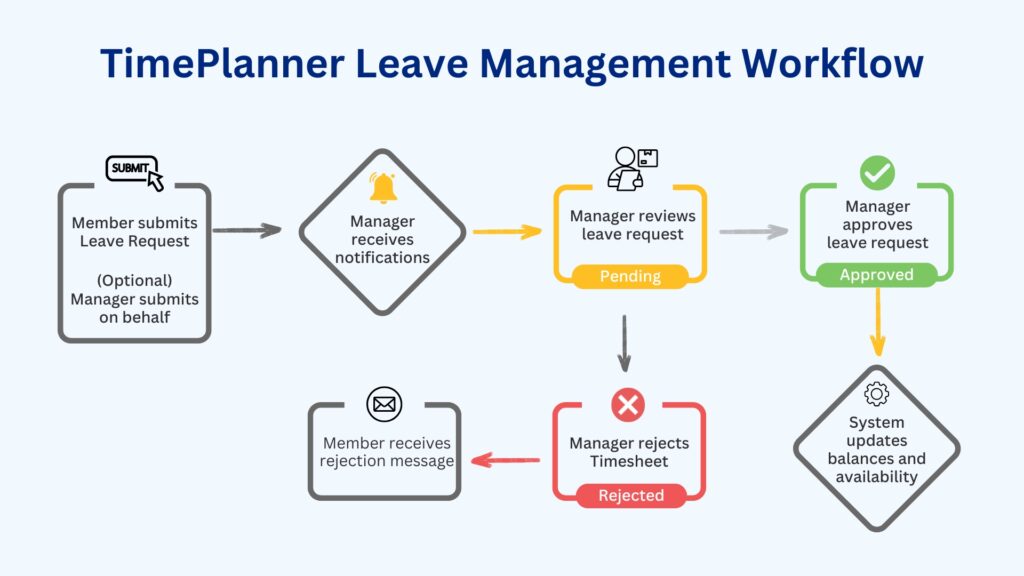
A typical day-off workflow includes the following stages:
-
Accrual: The employee earns leave time or is granted a leave quota.
-
Request: The employee submits a request for time off.
-
Validation: The system checks whether the request complies with company policies and available leave balances.
-
Approval: A manager reviews the request based on team capacity and business needs.
-
Recording: The leave is logged, leave balances are updated, and calendars or schedules reflect the absence.
A well-defined day-off workflow helps teams plan realistically and prevents surprises caused by untracked or unmanaged absences.
The challenges of native Jira leave management
While Jira is powerful for issue and project tracking, it is not designed to manage employee leave. Teams that rely on Jira alone often face the following challenges:
-
No clear visibility of team availability: Jira does not provide a team-wide view of who is off and when, making it easy to assign work to unavailable team members.
-
No leave balance tracking: Jira cannot track leave accruals or remaining leave days, forcing teams to manage this information manually outside the system.
-
Manual and unreliable workarounds: Many teams create placeholder issues like “Vacation – Alex” to mark absences. These clutter boards, distort reports, and don’t adjust capacity automatically.
-
Lack of approval workflows: Jira has no built-in process for approving, rejecting, recalling, or revoking leave requests, leading to approvals being handled through emails or chat messages.
-
Poor support for capacity planning: Because leave is not connected to schedules or capacity, planning often relies on assumptions rather than actual availability.
These limitations make native Jira leave management difficult to scale and unreliable for teams that depend on accurate planning.
Read more: Common Challenges of Leave Management in Jira and How to Overcome them
Setting up a day-off workflow in Jira with TimePlanner
TeamBoard TimePlanner bridges the gap in Jira’s native functionality by offering a comprehensive, visual, and automated leave management system. It allows teams to transition from manual, spreadsheet-based tracking to an integrated workflow where leave requests directly affect capacity planning.
Here is the step-by-step guide to setting up a clear and reliable leave management workflow inside Jira using TeamBoard TimePlanner.
Step 1: Defining leave policies in TimePlanner
Before employees start submitting leave requests, it’s important to define how leave should work in your organization. Clear leave policies help ensure consistency, reduce confusion, and make approvals easier for managers. In TeamBoard TimePlanner, these rules are configured centrally so everyone follows the same process.
1.1 Enable the leave approval workflow
The first decision is whether leave requests should require approval. When the leave approval workflow is enabled, all leave requests must be reviewed and approved before they are confirmed. This helps teams avoid coverage gaps, overlapping absences, and unexpected disruptions to project delivery.
If approval is not required, leave requests are recorded automatically. This option may work for smaller teams or environments with flexible policies.
1.2 Define default leave allocation
Next, define how many leave days employees receive by default each year. This forms the baseline leave entitlement across your organization.

-
Set the annual leave allocation
-
Decide whether unused leave days can be carried over to the next year
-
Define a maximum limit for accumulated leave
In some cases, specific employees or teams may require different leave entitlements. TimePlanner allows you to create custom allocations that override the default rules.
1.3 Define leave approvers
Control who manages the approval process:
-
Allow users to change the default approver if your organization supports flexible approval structures
-
Allow users to assign themselves as approvers, useful in small teams or self-managed environments
1.4 Configure leave types
Create distinct categories for time-off requests. Common leave types include:
-
Paid time off (PTO): A flexible pool combining vacation and personal time.
-
Vacation leave: Dedicated time off strictly for rest and recreation.
-
Sick leave: Unscheduled time off for illness or medical appointments.
-
Bereavement/Compassionate leave: Leave for grieving the loss of a loved one.
-
Parental leave: Long-term leave for childbirth, adoption, or childcare.

Step 2: Employee submits a leave request
On the My Requests page, employees can view their assigned leave allocation, remaining leave days, and leave already taken. This visibility helps them confirm they have enough balance before submitting a request.

To create a leave request, the employee selects the appropriate leave type, chooses the date range (including full days or partial days), and adds optional notes such as “Doctor appointment” or handover details. After reviewing the information, the request is submitted and marked as Pending, making it visible to the assigned approver for review.
If the request exceeds the available leave balance or does not comply with allocation rules, TimePlanner automatically prevents the submission and prompts the employee to adjust the request. This ensures that only valid leave requests move forward.
Managers or approvers can also submit leave requests on behalf of team members, which is useful for urgent situations, offline requests, or administrative support.
Step 3: Approver reviews the request
Once a leave request is submitted, the assigned approver receives a notification to ensure the request is reviewed promptly.
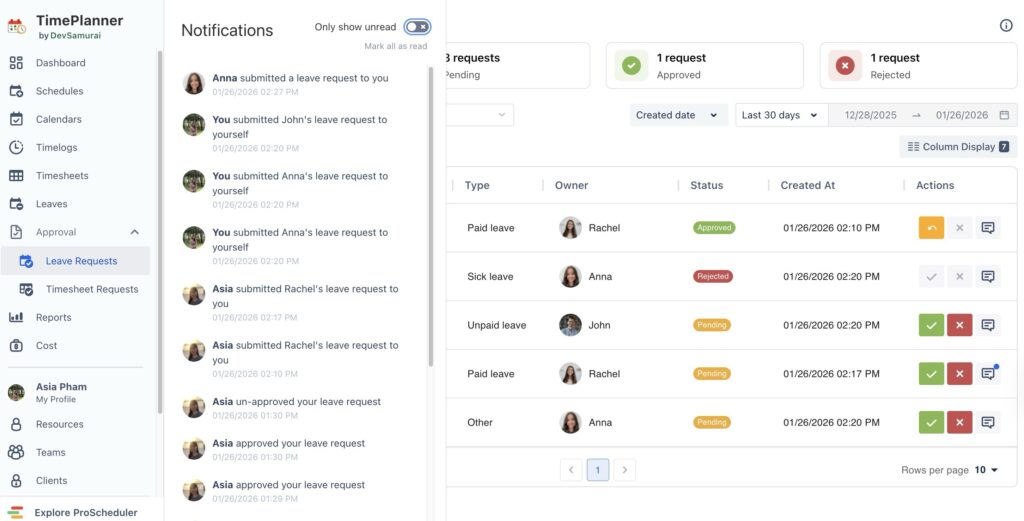
Approvers can access all pending requests from the Leave Requests section in TimePlanner. Each request includes key information such as the employee’s name, leave type, date range, and any notes provided.
Before taking action, approvers review the request in relation to team availability, existing approved leave, and current project commitments. If needed, they can communicate with the employee to clarify details.
Step 4: Approval or Rejection
After the review, the approver makes a final decision based on team capacity and business priorities.
When the request is approved:
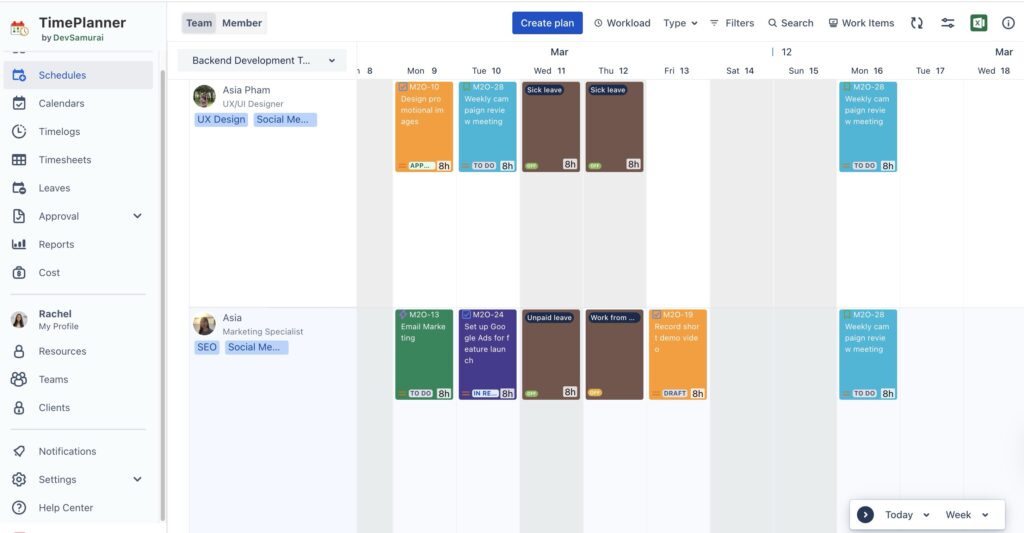
TimePlanner confirms the leave, deducts the requested days from the employee’s leave balance, and marks the employee as unavailable for the selected dates on schedules and calendars. The employee receives a confirmation notification.
Additionally, plans can change after leave has already been approved. TimePlanner supports this by allowing approved time off to be recalled or revoked in a controlled and transparent way.
When the request is rejected:
If the approver rejects the request, the employee is notified of the decision, along with a reason if one is provided. No changes are made to leave balances, schedules, or capacity, and the requested dates remain available for planning.
Conclusion
TeamBoard TimePlanner centralizes leave management directly within Jira, replacing disconnected manual processes with a structured, automated workflow that enhances team productivity and resource planning. By integrating leave requests into Jira’s scheduling, the app ensures accurate capacity planning and prevents overbooking or scheduling conflicts.
The post Setting up employee day off workflow in Jira is simpler than you think appeared first on TeamBoard – Resource planning, project management and Gantt Chart for Jira, monday.com.
Leave a Reply