
Jira is widely used as a foundation for managing complex workflows, client requests, and project delivery. It excels at execution—tracking issues, running sprints, and keeping teams aligned on day-to-day work. However, as organizations scale and manage work across multiple clients or business units, Jira alone often falls short when it comes to tracking profitability, billable capacity, and overall account health.
By integrating Jira with TeamBoard TimePlanner, Jira can be extended beyond task tracking and used as part of a Professional Services Automation (PSA) workflow. This ecosystem connects delivery data with financial and operational insights, enabling teams to track and manage work at the account level rather than piecing together information manually.
This article walks through how Jira and TimePlanner can be structured together to support account tracking at scale.
What Is Account Tracking?
Account tracking is the practice of monitoring, managing, and reporting on all work, time, and budget associated with a specific client (account), rather than focusing only on individual tasks or projects. It is commonly used in professional services, consulting, IT services, and agency environments where work for a single client often spans multiple projects, teams, and time periods.
Account tracking is important because it provides visibility into how effort translates into cost, revenue, and overall client health. Instead of relying on manual reports or spreadsheets, teams can understand whether an account is staying within budget, being delivered profitably, and consuming capacity as expected.
How to Use Jira for Account Tracking
Step 1: Setting Up Your Account Tracking Project in Jira
Jira is the system of record for execution. This phase focuses on structuring Jira so delivery data is clean, consistent, and ready to be used for account-level tracking later.
1. Create Dedicated Jira Projects
Start by creating Jira projects that represent how work is executed in your organization. A Jira project should group related tasks that share a common workflow, team, or delivery model.
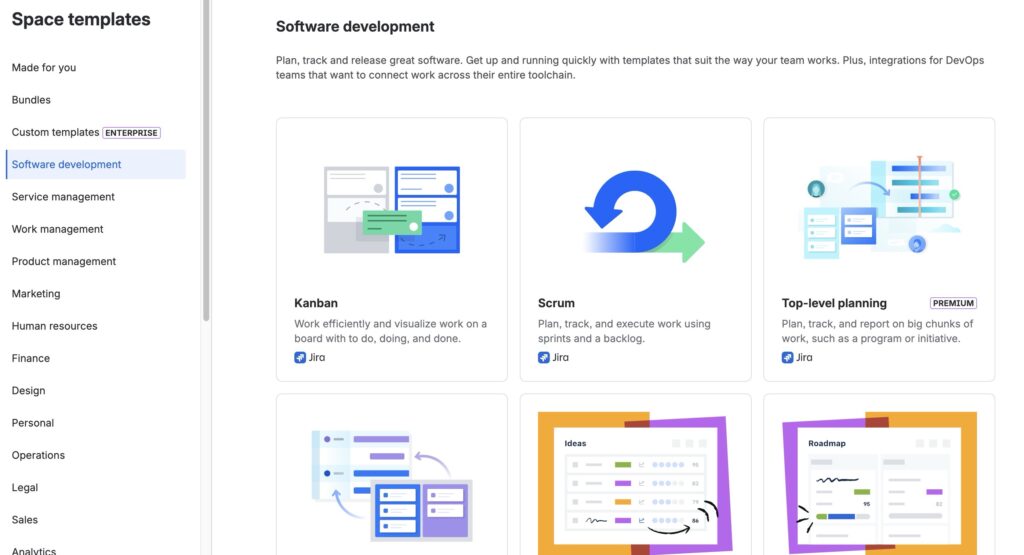
Depending on the nature of the work, teams typically use:
-
Jira Software for development and sprint-based delivery
-
Jira Service Management for support requests and client-facing portals
-
Jira Work Management for non-technical or operational work
2. Define Account-Level Custom Fields
To prepare Jira data for account-level tracking, configure a small set of custom fields that capture essential client context on issues or, where appropriate, at the project level.
Common account-related fields include:
-
Client name or account
-
Contract type (Retainer, Fixed Project, Time & Materials)
-
Billing category (Billable / Non-Billable)
-
Service line (Design, Development, SEO, Support)
-
Account owner
These fields make it easier to filter work, keep reporting consistent, and pass structured data into TimePlanner. Keep the number of fields limited so teams can complete them reliably as part of their normal workflow.
3. Configure Issue Types and Hierarchy
Use Jira’s issue hierarchy to break down client work in a structured, predictable way.
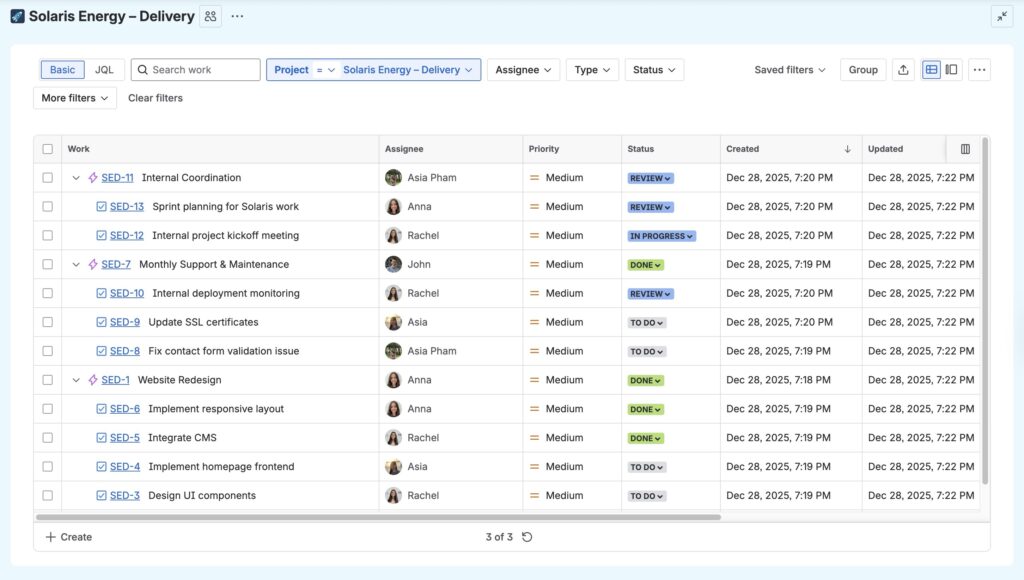
A common agency hierarchy looks like:
-
Epics → Major client deliverables or phases.
-
Stories or Tasks → Individual pieces of work delivered to the client.
-
Sub-tasks → Detailed steps or internal activities.
This structure helps teams track progress, log time accurately, and understand how individual tasks relate to larger client work.
4. Define Workflows That Reflect Delivery Health
Establish workflows that clearly show where work stands and what comes next. A typical delivery workflow might include: To Do → In Progress → Review → Approved / Done.
For support or client-request projects, additional statuses such as Waiting on Client may be useful.
Using clear and consistent workflows across projects helps teams identify bottlenecks early, understand delivery status at a glance, and avoid closing work before it is truly complete.
Step 2: Importing Client Data and Contacts in TimePlanner
Once your Jira projects are set up, you must create client profiles in TeamBoard TimePlanner. These profiles serve as the central repository for client information and will be linked to Jira projects for account-level tracking.
The goal of this step is to ensure every client exists in TimePlanner with accurate details before tracking time, cost, and capacity.
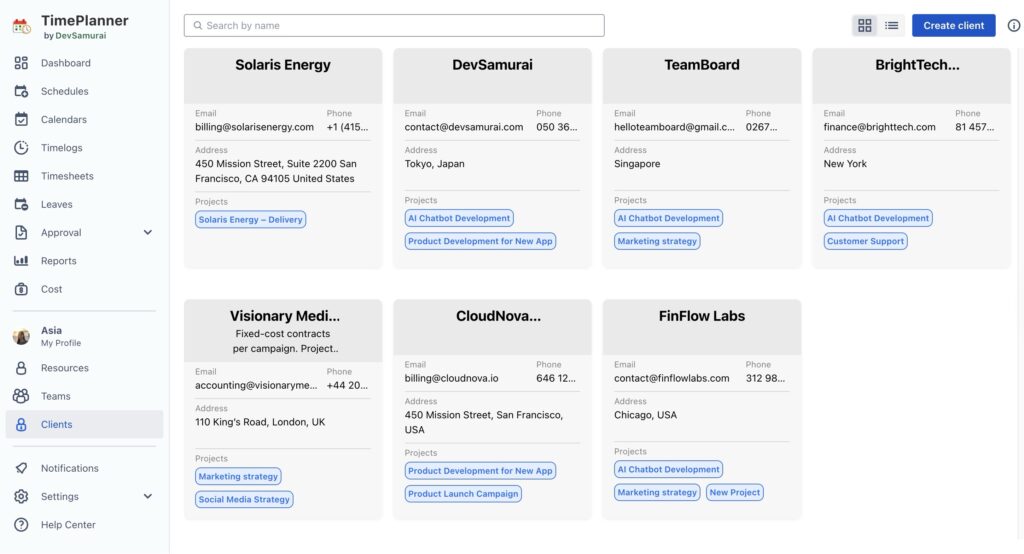
To create a new client:
-
From the left-hand navigation, click Clients to access the client management page.
-
Click the Add Client button in the top-right corner
-
Fill in the following basic client details: name, phone, email, address, etc.
-
Link the TimePlanner Account to Jira Projects: In the Project field, search for and select the Jira project or projects associated with this client. A single client can be linked to multiple Jira projects, which is common when work is split across delivery, support, or different service lines.
Learn more: How Outsourcing Companies Can Manage Multiple Client Projects in Jira
Step 3: Assigning Accounts in the Planning View
When scheduling work in TimePlanner, you assign a client account to each planned task. This ensures that planned hours and later logged time are attributed to the correct client for cost, capacity, and reporting.
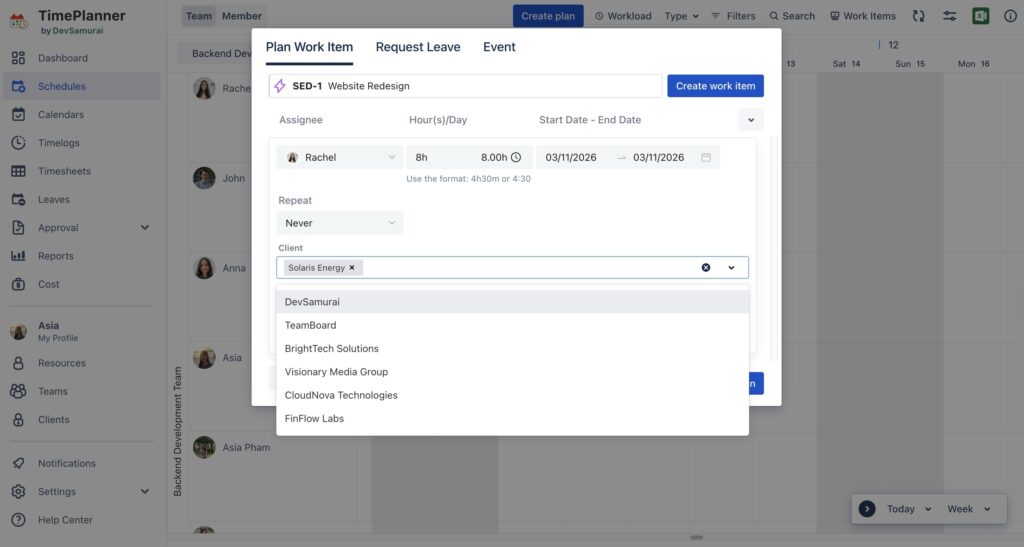
-
Open the Planning Dialog: Navigate to the Schedules board, where you see your team members and their timelines.
-
Create or Edit a Task: Click and drag on the timeline to create a new task, or click an existing Jira issue to open its detail panel.
-
Select the Account: In the Account dropdown menu, you will see a list of clients you created in Step 2. Select the appropriate client.
Step 4: Managing Billable and Non-Billable Work
When planning or editing a task in TimePlanner, you must specify whether the work is Billable or Non-billable. This setting acts as a financial tag that tells the system how to treat the hours for reporting and billing.
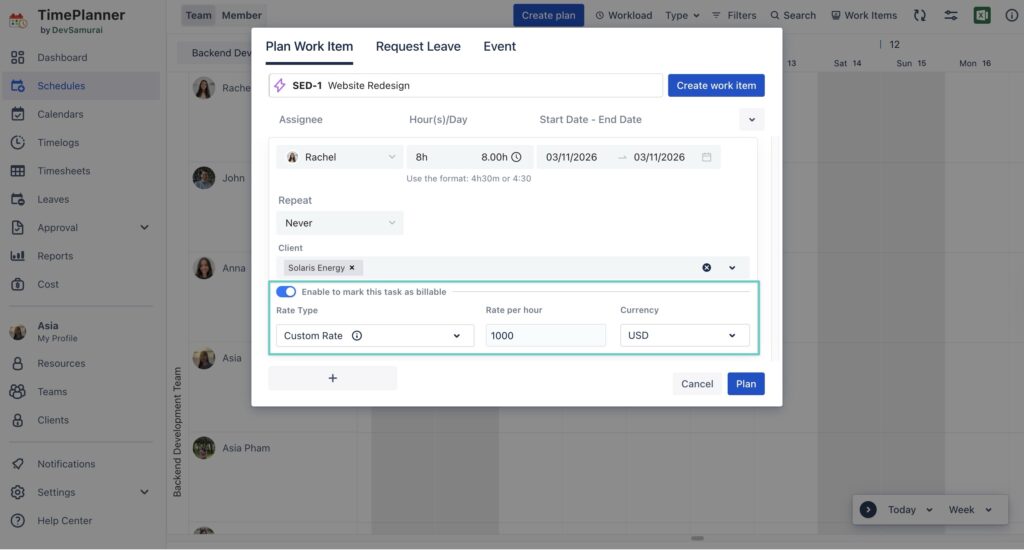
-
Billable: Hours marked as billable are included in revenue, billing, and profitability reports.
-
Non-billable: Hours marked as non-billable are excluded from revenue calculations but are still counted for capacity and utilization tracking.
Selecting the correct option is important. It ensures that client invoices, revenue reports, and utilization metrics are accurate without requiring manual adjustments later. Once saved, any time logged against the task will follow this billable setting automatically.
Step 5: Monitoring Team Workload and Capacity
Once tasks are planned and assigned to client accounts, TeamBoard TimePlanner provides real-time visibility into team workload and capacity.
TimePlanner shows each team member’s available time versus planned time, making it easy to see who is fully booked, underutilized, or overallocated. This helps ensure that work is distributed evenly and that no one is consistently overbooked.
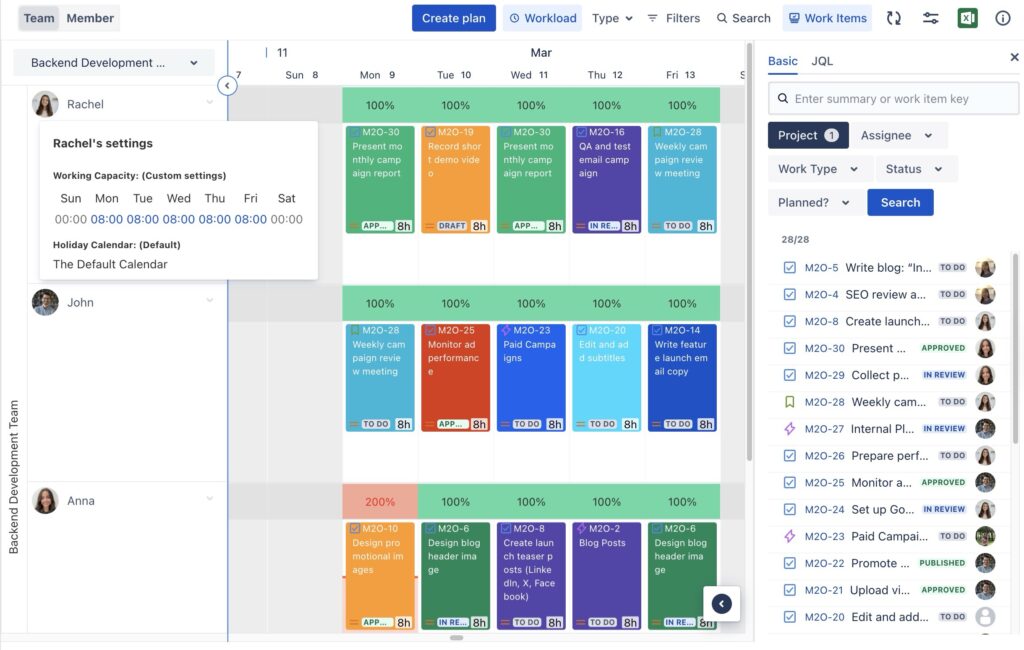
If a team member is overloaded or at risk of burnout, you can quickly adjust the plan by:
-
Reassigning tasks to another team member
-
Moving work to a different date
-
Reducing or redistributing planned hours
Making these adjustments early helps maintain balanced workloads, reduces burnout, and keeps client delivery on track.
Step 6: Integrating with other tools
Deadlines are critical in account-based delivery. When one task or project slips, it can impact the entire client account. To manage this complexity, TimePlanner can be used alongside TeamBoard ProScheduler. This integration provides more advanced scheduling and dependency management across projects.
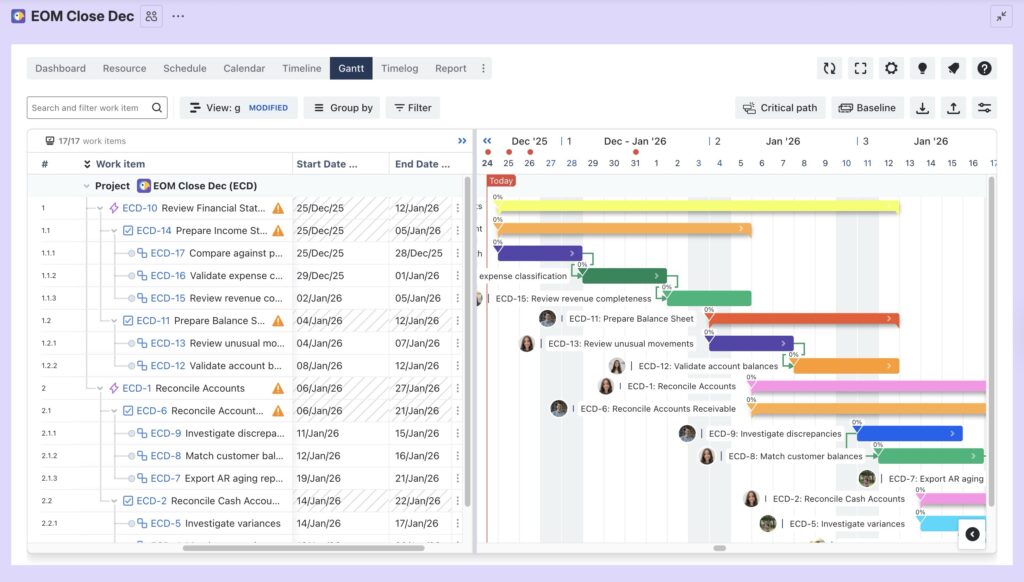
-
Timeline & Gantt Views: Use TimePlanner’s Gantt Chart to visualize the roadmap for an account. You can see how a “Design Phase” in one project is a prerequisite for a “Development Phase” in another.
-
Dependency Mapping: Link tasks across project silos. If the client delays their “Asset Delivery” task, TimePlanner will automatically shift the start dates for the subsequent production tasks.
Step 7: Monitoring Account Health in Real Time
Finally, use the Cost Report in TeamBoard TimePlanner to monitor account health as work progresses.
The Cost Report shows how planned and logged time translates into cost and billable value for each client. By reviewing this report regularly, you can see whether an account is staying within budget or moving toward an overrun.
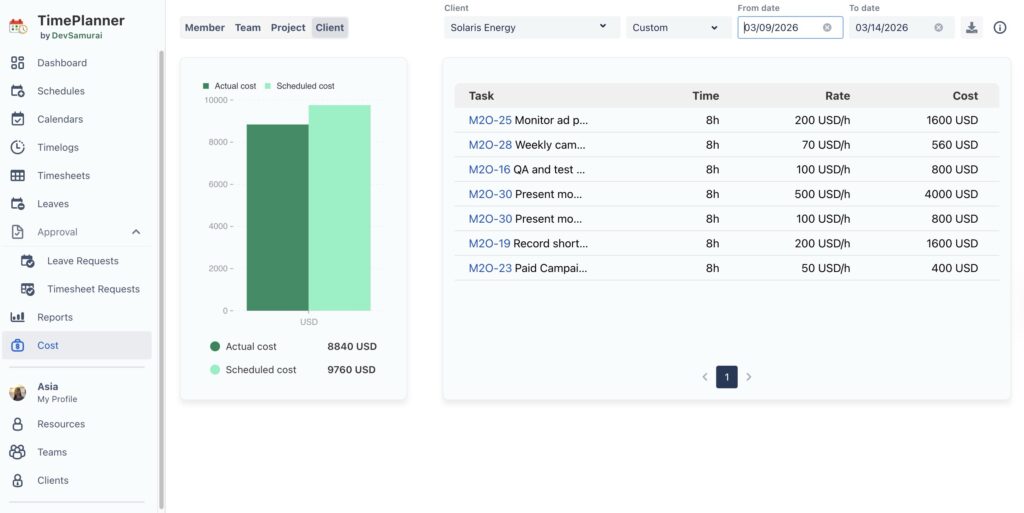
With the Cost Report, you can track:
-
Actual cost versus planned or expected cost
-
How much budget has been consumed and how much remains
This visibility allows teams to identify scope creep, margin erosion, or budget risks early and take corrective action before the billing period ends.
Final Thoughts
With clear project structures in Jira and consistent use of TimePlanner for planning, billing, and reporting, teams can reduce manual effort, improve accuracy, and maintain a clear view of account status. The result is better control over workload, budgets, and delivery outcomes, allowing teams to manage accounts proactively instead of reactively.
The post How to Use Jira for Account Tracking appeared first on TeamBoard – Resource planning, project management and Gantt Chart for Jira, monday.com.
Leave a Reply